It’s no secret that I believe journaling (or tracking) is one of the best things you can do to help yourself lose weight. There are many different ways you can journal, but blogging is a personal favorite of mine! We’ve had many people write in to Simple Nourished Living asking for advice on how to get started with a blog of their very own – so we’ve pulled together some of the things we wished that we knew when we started, way back in 2007 – in this Ultimate Guide to Starting a Weight Loss Blog.

Why Start Your Own Weight Loss Blog?
Now you may be asking yourself, “Isn’t losing weight hard enough by itself without adding in one more thing? I’m already too busy!”
And yes, we absolutely agree with you that losing weight takes work and can continue to be a challenge once you’ve reached your goal weight and shift into maintenance mode.
But the truth is that one of the best things you can do to lose weight is keep a journal. It’s so important I consider journaling/tracking the #1 Rule for Weight Loss Success.

Studies have shown that when you keep a food journal, you are more likely to lose weight because the act of writing something down creates an awareness that didn’t exist before. And those who keep a food journal are more successful at losing weight than those who don’t.
But, we all know that losing weight is about more than just food, so a blog can be the ultimate weight loss/maintenance journal, providing accountability, self-discovery, connection and even income.
When I launched this blog back in 2007, I didn’t have a clear plan in mind. I just wanted an outlet to share my interests. Looking back, I realize that simple-nourished-living.com, has been integral to helping me create the simple, nourished, life I’ve always craved.
Also, most of my private yoga clients find me and contact me through my yoga page. And I now make a comfortable part-time income from blogging, which continues to increase month after month and year after year!
If you take a long-term approach and are committed to learning and working hard, your blog could even turn into a reliable source of significant income one day. Take for example, my friend Tammy who has the blog, OrganizeYourselfSkinny.com, where she shares her income reports.
And most importantly for this Lifetime Weight Watcher who has struggled with her weight since childhood, I have been successfully maintaining my weight since beginning this blog, something I had never been able to do previously. Just a coincidence? Possibly, but I don’t think so!
I would encourage anyone who wants to lose weight, maintain their weight, get out of debt, simplify their life, travel, pursue a hobby, learn a skill or seriously change their life in any significant way to start a blog TODAY! (Keep reading and Peter will provide you with step-by-step instructions for how to do just that!)
You may be thinking that you’re not the type of person who wants to publicly talk about and share their weight loss struggle. That’s okay. Blogging can also be an outlet for anything your passionate about… Maybe it’s organizing, reading, cooking, knitting, photography, painting, poetry, gardening or scrapbooking. It could provide the perfect positive outlet/distraction in your own weight loss journey.

Just think, if you were busy working on your blog, you would less likely to have the time or inclination to sit around mindlessly munching out of boredom!
Now I’ll turn things over to Peter and he will walk you through all it takes to get started with your own blog in three easy steps: 1) buying your own domain name, 2) buying your web hosting plan and 3) installing WordPress.
Before we get started, here’s a glossary of a few key technical terms so his instructions will make sense:
Technical Glossary
- Blog: Short for the term weblog. Describes a method for publishing information on the Internet in pages and posts that are usually shown in reverse chronological order (very much like an online diary or journal).
- Bluehost: A company that offers both website and domain name hosting.
- Content Management System (CMS): A software application used to manage the content of a web site.
- Domain Name: The name that identifies a particular computer/website on the Internet. For example, when you see the URL https://simple-nourished-living.com – the domain name is just the “simple-nourished-living.com” part.
- Domain Privacy (aka WHOIS Protection): Hides the domain name registrant’s personal information from being shown publicly in the WHOIS database.
- Hosting: Storage locations for website files and domain names on powerful computers connected to the Internet.
- Self-Hosted: Having complete control over your website – meaning you are responsible for managing all aspects of it.
- URL (Uniform Resource Locator): This is often known as the web address. In the example above, the URL would be everything, including all the letters and characters in https://simple-nourished-living.com
- WHOIS: The organization that manages all data regarding domain name registration.
- WordPress: A free (aka open-source) and easy-to-use publishing software and content management system (CMS).
3 Simple Steps To Starting Your Own Weight Loss Journal Online
We strongly suggest starting off with your own self-hosted blog. This gives you ultimate control over your website/blog, a more professional appearance and provides the greatest opportunity to turn it into a valuable, revenue-producing asset one day, should you ever decide to.
Note: Simple-Nourished-Living.com has direct experience working with BlueHost and recommends their web hosting services – especially for new websites and blogs. We are an affiliate partner with BlueHost and our readers can use this special link to receive web hosting services and a free domain name for as low as $3.49/month – a special deal we’ve created with Bluehost for Simple Nourished Living readers.
Click here to get this article as a PDF
Step 1: Website Domains and Website Hosting – The Basics
When you decide that you’re ready to create a new website (or blog), there are two things that need to happen before anything else:
You need a website domain name – which is the name people use to find you. For example, google.com or yahoo.com or simple-nourished-living.com – these are all the domain names for each respective website.
You need a website host – which is where all the individual files that makeup your website (or blog) will live.
For just $3.49/month, starting a new blog on Bluehost is one of the cheapest most cost-effective ways to get started building a weight management blog, or gardening blog, or knitting blog – which has the opportunity to one day become a real revenue-generating business.
If you already have an awesome idea for a domain name, then great! For most us, it takes a little bit of creative thinking and research.
The Best Tips for Finding Your Perfect Domain Name:
(You will notice that our domain name: simple-nourished-living.com, breaks almost every one of the following rules! Exactly why we have put together this Ultimate Guide for those of you who want to start a weight loss blog with all the information we wish we had known back when we started!)
- Keep it short and easy to type
- Consider avoiding, or at least minimize the use of numbers and/or hyphens (this is one thing we would probably do differently if we had to do it all over again – but hey, it’s a learning experience)
- It should be easy to tell someone else and (hopefully) memorable in some clever way
- It should relate to the main topic of your site
- It should be unique, so as not to be easily confused with other sites
- Try, try, try to keep it a .com (as opposed to a .net or .org or any other of the many options available these days)
- Does it let people know exactly what you’re blog’s about when they hear it (i.e. HungryGirl.com, or SkinnyTaste.com, or RonisWeigh.com, or DiaryOfAnAspiringLoser.com or CardioForCosmos.com – you get the idea)
- Avoid using someone else’s trademark by searching on USPTO before buying
Be sure to give it some thought, but there’s no need to spend days and weeks agonizing over your decision on which website domain you should buy. I say if you find one or two that you like – and are available to purchase – sleep on it, then go with your gut or purchase them both. It’s a small price to pay for getting the domain that you really love.
One of my favorite online domain name generators is Lean Domain Search.
They allow you to enter in a keyword or two that you’d like to include in your domain name and it then returns a whole bunch of choices for you to sort through. But don’t order your domain through Lean Domain Search. Just write down the domain you want and be sure to come back here and order your domain for free at the same time you order your Bluehost website hosting!
And I won’t get into it here because it’s a little advanced, but think of your domain as forever. It will be possible for you to change it in the future if needed, but it’s lengthy process to undergo and you could end up losing some search engine rankings (at least in the short-term). Please remember, it’s best to choose a domain name that you love from day 1 – and plan to stick with it.
There were many times when we felt we should change the name of our site from Simple-Nourished-Living.com to something more clever. But after a few days, these thoughts always passed and we believed that this really is the best domain name that represents the website we are building. If there is one thing we could do over, we would not have used the dashes (or hyphens), but we didn’t know any better at the time :)!
Once you have your domain name picked out you are ready to order your web hosting package.
Click here to get this article as a PDF
Step 2: Ordering Your Web Hosting
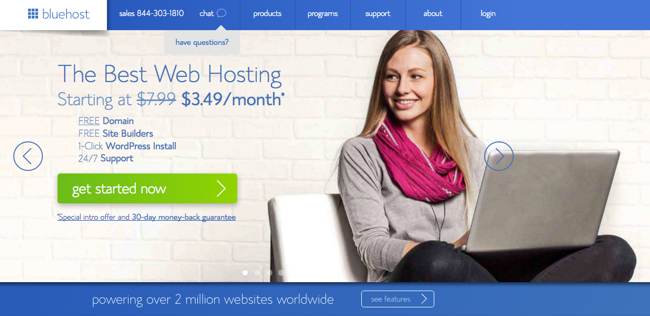
Click here to order web hosting at Bluehost. You’ll be taken to Bluehost after clicking on our affiliate link (Martha and I are grateful for your support of Simple Nourished Living)! You’ll see a page that looks something like this, so just click the big green Get Started Now button.
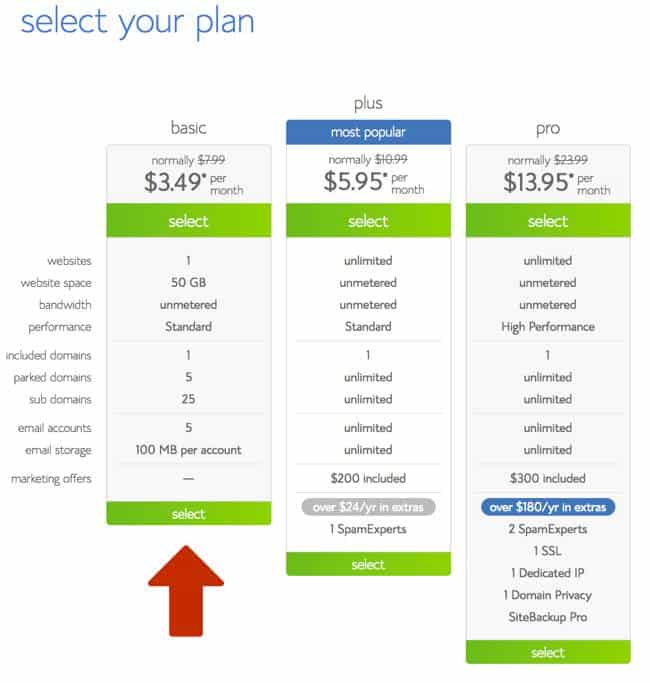
Selecting Your Hosting Plan
The basic plan is a great and cost-effective way for you to get started with your blog. And remember, you can always upgrade your hosting plan as soon as it becomes necessary.
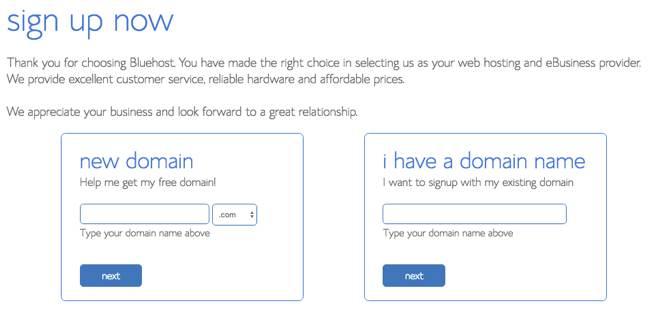
Ordering Your Domain Name
If you are getting your domain name through Bluehost, you can add it to the box on the left where it says “new domain.” Then just click next.
If you are like us and have already purchased your domain, you can add it to the box on the right where it says “I have a domain name.” Then just click next.
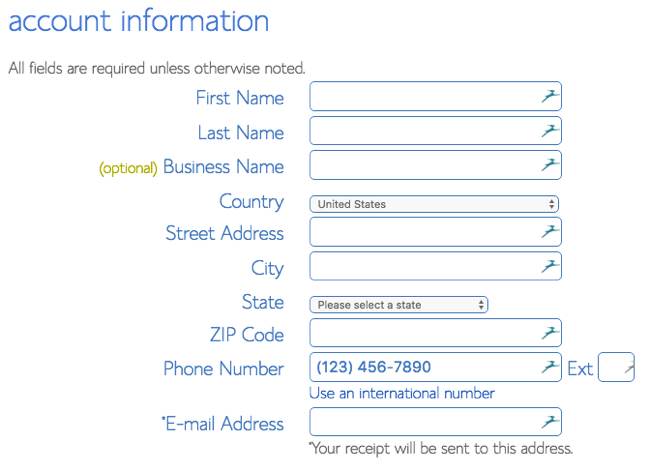
Adding Your Personal Account Information
On the top of this page, you need to enter in your account information. Be sure to use an email that you check regularly because you will receive important information (including your web hosting receipt and renewal information) at this email address.
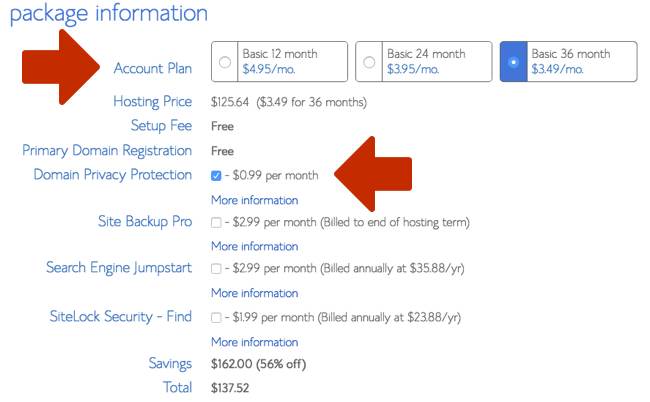
Choosing Your Web Hosting Package
When selecting your package information, you have a few options. To get the best deal, I suggest you choose the Basic 36 month (3 years) plan which means you are paying in advance for 3 years of hosting and getting the best deal possible. If you prefer to buy only 24 months (2 years) or 12 months (1 year), then that is up to you.
Just remember that if you purchase 12 months (1 year) of hosting now, then you’ll have to pay again when you renew your plan one year from now.
Bluehost offers a money-back guarantee, so there is no risk in purchasing 36 months in advance. For example, if you decide after one year that you no longer want to continue, Bluehost will calculate how much of your plan you haven’t used (the remaining 2 years) and issue you a refund for that unused time. You won’t be refunded for time (the first year) that you have already used.
When ordering your domain name with Bluehost, the other option you have is whether or not you’d like to pay for Domain Privacy Protection. Basically, this is privacy protection that will prevent your personal contact information from being displayed to the public (i.e. anyone searching on ICANN WHOIS.)
There really is no right or wrong when deciding between purchasing Domain Privacy Protection or not. It’s a small price to pay if keeping your contact information private is important to you. I feel this is a simple matter of personal preference.
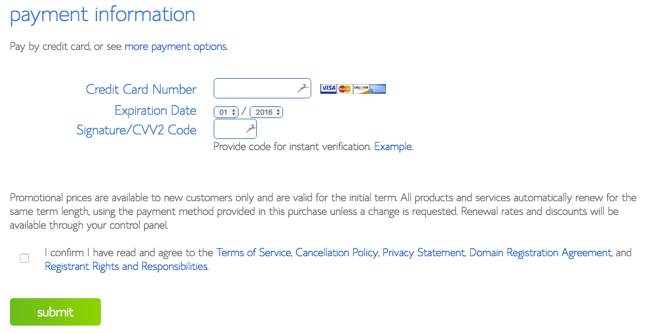
Entering Your Payment Information
Next, you just have to enter in your credit card payment information. If you prefer to pay with PayPal, just click the blue text “more payment options” below the payment information heading and you will see the PayPal option. Then just agree to the Bluehost service agreement and click the big green submit button when finished and your order will be processed.
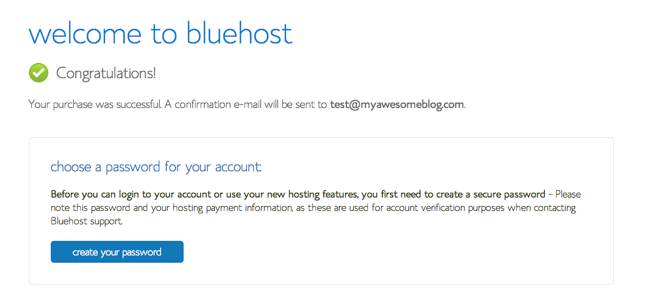
Welcome to Bluehost!
Congratulations! You now officially have a web hosting account with Bluehost. Click the big blue button to “create your password”:
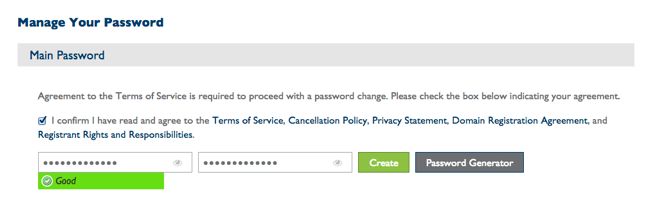
Creating Your Bluehost Account Password
Enter in your secure password and be sure to keep this information in a safe place! Make it a strong password by entering both uppercase and lowercase letters, along with numbers and special characters. Click the big green “Create” button
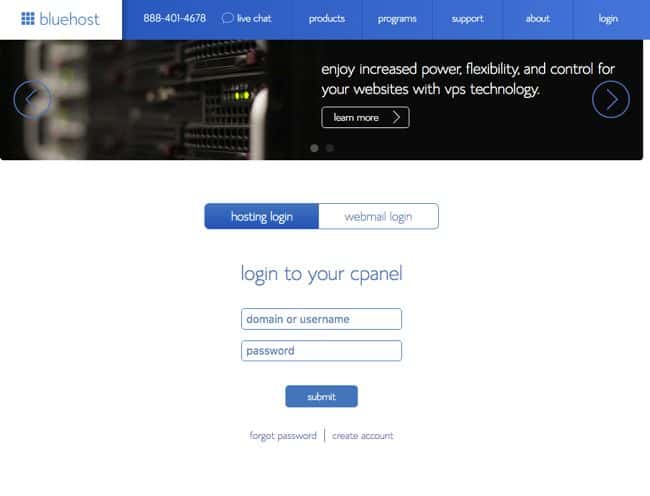
Your Bluehost Hosting Account Login
Enter in your domain (or username) along with your password and click the big blue Submit button to enter your Bluehost account. (Be sure that the toggle for “hosting login” is selected and highlighted blue and not “webmail login”.)
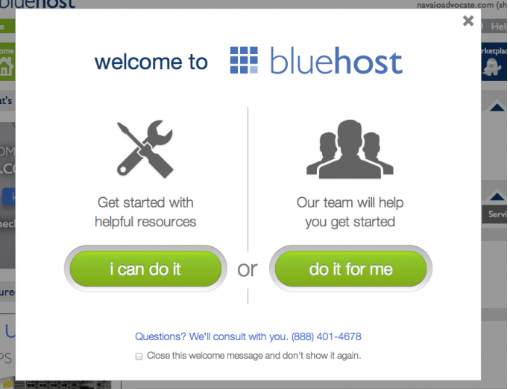
Logging Into Bluehost the First Time
When you login to your account the first time, you’ll get this little welcome to Bluehost window. If you don’t want to see this every time you login, you can check “Close this welcome message and don’t show it again.”
Click here to get this article as a PDF
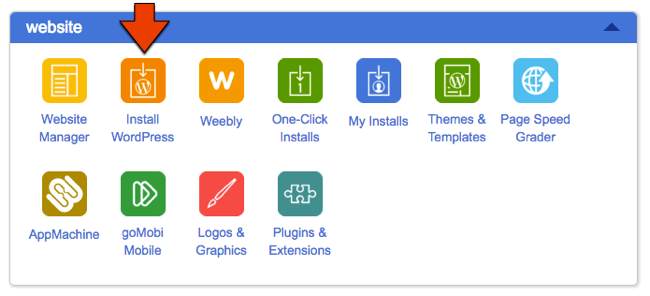
Step 3: Now it’s time to install WordPress
Once logged into your cPanel account at Bluehost, in the top section named “website” you’ll want to click on the orange button named “Install WordPress.”
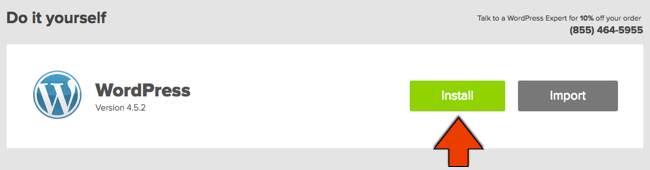
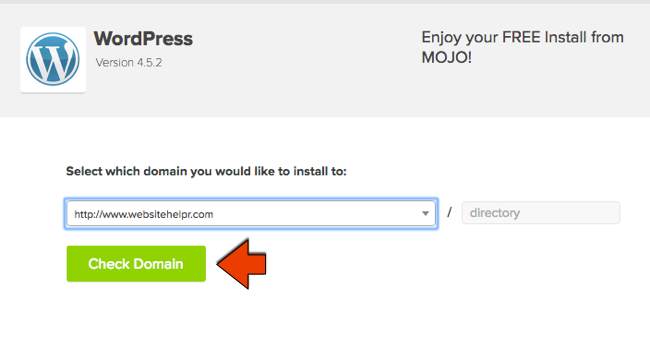
At the top of the next page under “Do it yourself,” it will name WordPress along with the current version. Just click the big green Install button.
Select your domain and click the big green Check Domain button.
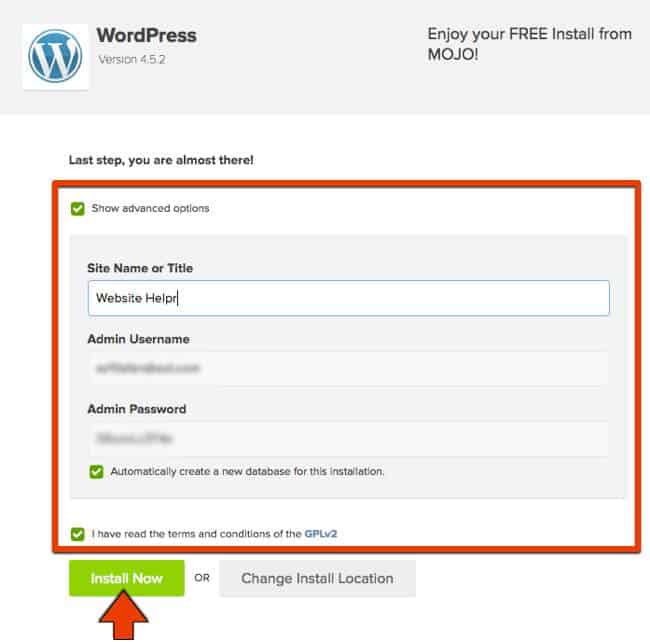
Now, you’re almost there. Complete the information on this page:
- Click “show advanced options” and enter your Site Name or Title (don’t worry, you can easily change this later).
- Be sure to enter a secure admin username and admin password. Never, ever use “admin” for username because this is the #1 username that hackers will try when attempting to maliciously gain access to your WordPress blog. Always keep your WordPress Admin Username and WordPress Admin Password in a safe place because you will need to use this each and every time you login to your WordPress website/blog (and that will be almost every day).
- Be sure to check “Automatically create a new database for this installation” (unless you already have a WordPress Database set up. But since this is a brand new blog I’m assuming a database doesn’t already exist. If you don’t know what this is, then just make sure that it is checked.)
- Check “I have read the terms and conditions of the GPLv2”
- Finally, click the big green “Install Now” button.
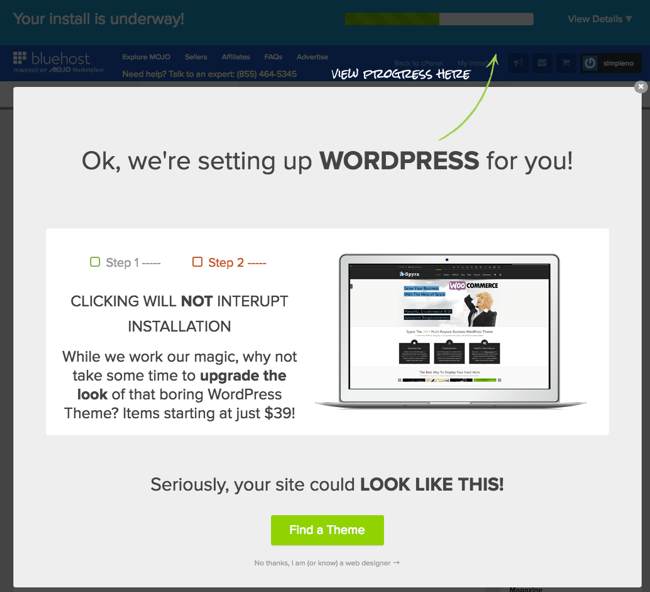
On the next screen, you’ll see a page that looks like this with an installation progress bar at the top. There’s no need to worry about finding a theme right now, so feel free to click the link called “No thanks, I am (or know) a web designer” underneath the big green “Find a Theme” button:
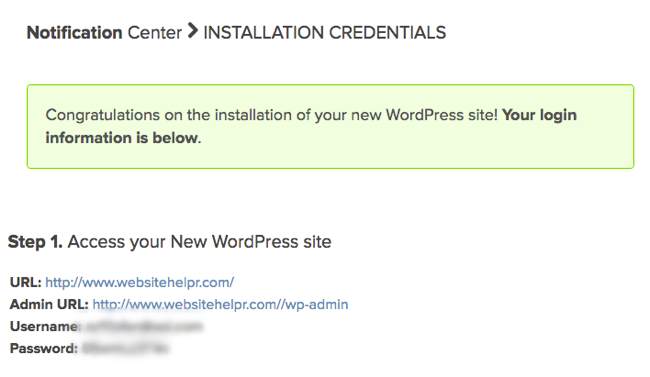
Once your installation is complete, the top of the page will turn orange and you should click the big black “View Credentials” button:

Here you will see your WordPress login credentials. Be sure to copy this information and store it in a safe location! The URL: field is the location of your new WordPress blog. The Admin URL: field is the address you need to go to every time you login to WordPress. The Username: field is your username for logging into WordPress. The Password: field is your password for logging into WordPress.
Congratulations – you have just successfully installed your very own WordPress blog!
Now the fun begins!!
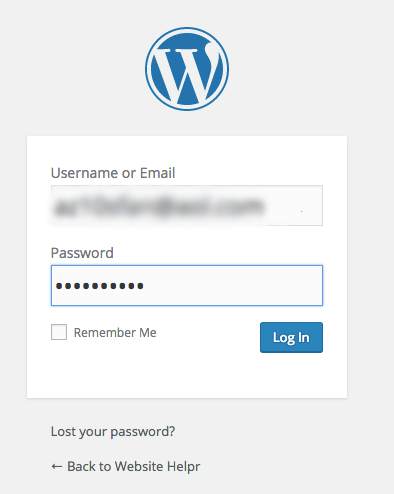
Click the link for Admin URL to login to your blog for the first time. Enter your Username and Password and click the big blue “Log In” button:
After you are logged in, you will be in the WordPress Back-End or WordPress Dashboard. It should look something like this:
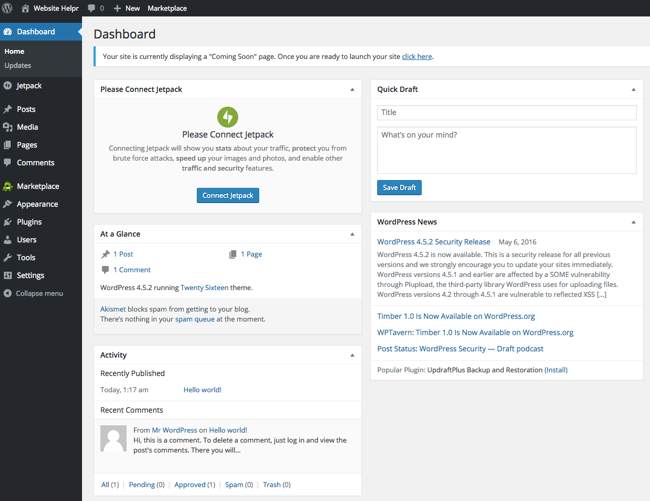
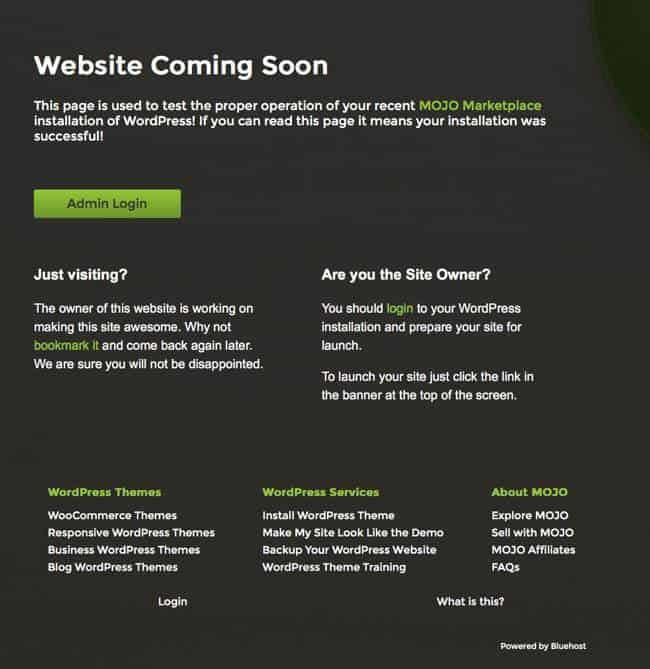
If you notice at the top of your WordPress Dashboard, there is a message that says “Your site is currently displaying a “Coming Soon” page. Once you are ready to launch your site click here.” Open another tab and go to the URL for your site and you can see what your Coming Soon page looks like.
Mine looks like this:
The WordPress Dashboard Overview
Watch this brief video (just a little over 6 minutes) to familiarize yourself with the WordPress Dashboard. It will explain how to customize the WordPress interface specifically for you and how to hide those modules that you’ll rarely use. You’ll see how the navigation menu functions and take a quick look at the Quick Draft mode that allows you to quickly save new ideas.
Disclaimer: We first started using Bluehost as the web host for Simple-Nourished-Living.com when we started this blog/site back in 2007. We trust this company, their 24/7 customer support, their money-back guarantee and the fact that they currently power over 2 million websites worldwide. Purchasing a web hosting plan with Bluehost through any links on this page means Simple Nourished Living will receive a small referral commission. We only recommend products and services that we fully trust and use ourselves. You will not pay more when buying through our links. In fact, you actually may be getting a better deal since we can often negotiate better prices that aren’t available anywhere else.