This post may contain affiliate links. Please read our disclosure policy.
THE WINNER OF THE YOGURT MAKER IS:
Lauretta G. who said, “for breakfast Fage, blueberries, flax seed or nuts, for a snack – Fage yogurt, PB2 (affiliate link), nuts, for dessert – Fage yogurt, cinnamon, chopped nuts or yogurt and peaches. Just discovered Lemon Oui by Yoplait and put a dollop on my WW lemon cake, heavenly!”
Congratulations, Lauretta!
Please send an email to: support@simple-nourished-living.com to claim your gift card!
When Linda shared an idea for a post about making your own yogurt I was excited to have her share her secrets with us.
So excited I’m giving away a yogurt maker! You’ll find all the details at the end of the post.
I love yogurt and have experimented with making it myself. I have made yogurt in the crock pot and the Instant Pot.
I have even been tempted to buy one of those fancy yogurt makers.
Now after reading this post from Linda I am so glad I waited…
This is a Guest Post from Simple Nourished Living Reader, Linda Sepada
How to Make Yogurt with a Bulk Yogurt Maker
As we move well into spring, some of our resolutions to create and/or maintain healthful habits may still be intact.
Eating yogurt supports these habits in a number of ways. Making yogurt can provide at least one more way of supporting those habits.
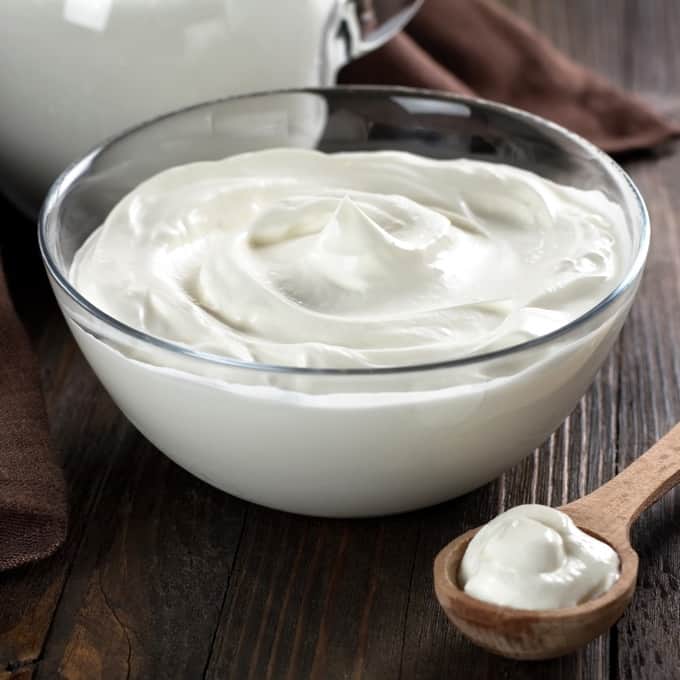
Believe it or not, very little equipment or preparation is required to make yogurt.
When I began to make my own yogurt, I used items already in my household to culture, then store the yogurt.
My only initial investment was in a carton of plain yogurt in a brand I like.
You may have read about the need to heat the milk, then cool it to about 110 degrees Farenheit. That requirement is necessary if non-pasteurized milk is used. When pasteurized or ultra-pasteurized milk is used, this step is not required.
You may also have read that the starter culture must be whisked into the milk. When yogurt is made in small individual serving containers, this step is necessary, for a small amount of culture must be included in each of the smaller containers.
If the yogurt is made in a larger batch, the culture can be “plopped” into the milk with no further ado.
How much easier can making something so healthful and delicious be?
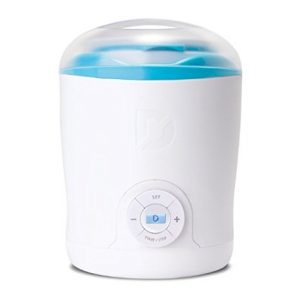
Here’s one way: use a batch yogurt maker. These are not the $70 yogurt makers with small glass jars.

A Batch Yogurt Maker looks something like a small slow cooker, and can handle one quart of milk at a time. It costs between $25 and $30.
Yes, for the price of less than three weeks’ worth of my usual yogurt purchases, I bought a yogurt maker that has eliminated additional yogurt purchases, except for the original starter container, which was used as the starter culture.
I’ll describe the yogurt maker soon, but first let me tell you a bit more about how making yogurt can help control what is put into your, or your loved one’s, body.
You decide what kind of milk is used. It can be full-fat, 2% fat, 1% fat, or non-fat.
It can be organic, with no GMO.
Whatever requirements you may have for the milk, can be applied to the starter yogurt as well.
You also control any flavorings you choose to use, whether it is jam, fruit, honey, nuts, or anything else that you like to include.
Frequently Asked Questions About Making Your Own Yogurt
Q:How long does it take to have this miracle food?
A: The answer is, “That depends.”
What does it depend on?
Making yogurt is done in two steps. The first step is the preparation. The second step is the culturing.
The preparation—with a bulk yogurt maker and pasteurized milk—takes less than one minute.
The culturing takes from eight hours to twenty-four hours, depending on several factors:
- The temperature of the milk with the culturing begins.
- The degree of tanginess and thickness desired in the yogurt.
- If I want to cut down on the culturing time by about two hours, I warm the milk to lukewarm before turning on the yogurt maker.
- I like my yogurt very thick and tangy, so I set the timer for twenty-four hours. For less thick and tangy yogurt, a minimum of eight hours is required.
Q: What happens after the yogurt is finished?
A: Several things can happen:
- The yogurt can be used “as is” in bulk form
- The yogurt can be portioned into smaller containers, as plain yogurt (possibly to be flavored individually, just prior to consuming a container of yogurt)
- Flavorings can be added, either to the batch, or to some or all of the smaller containers
- The yogurt can be strained to provide one of three different further results:
- Greek yogurt is made by straining the basic yogurt for at least two hours.
- A sour-cream-like substance is made by straining for about four hours.
- A result very similar to cream cheese is produced by straining the yogurt of approximately twenty-four hours.
The whey that results from the straining can be used as liquid in bread making, or in soups and stews. It is flavorful and contains protein. Here is one more “whey” that making yogurt can support healthful eating.
You’re probably on the edge of your seat now, just waiting to hear all about this miracle appliance that produces yogurt, sour cream, and cream cheese so easily and inexpensively.
All the pieces of the bulk Greek yogurt maker fit into the main container, which is what heats the milk—except for the main lid, which is domed and fits on top.
The yogurt maker can be purchased as a regular yogurt maker or a Greek yogurt maker.
The difference is that the Greek yogurt maker includes a very fine sieve to use to strain the whey from the basic yogurt.
The cost difference between the two is negligible.
Here’s what is included in the Greek bulk yogurt maker:
- The main container, which contains that settings panel and the heating element.
- Two inner “buckets.” One bucket fits just inside the other. Each is marked with a “max” line at the one-quart level. The two buckets nest inside the main container.
- One flat lid that fits across either of the buckets.
- One clear domed lid that fits on top of the main container.
- One fine mesh sieve that sits on top of either of the two buckets.
The plain yogurt maker is the same, except that no sieve is included.
I used a sieve with a coffee filter inside to strain yogurt before buying the bulk yogurt maker.
Did I mention that these little machines come is fun colors, and are six inches in diameter and ten inches tall?
Here’s a video showing how easy it is to make yogurt in a bulk yogurt maker…
How to Make Yogurt in a Bulk Yogurt Maker
Finally, how do I make yogurt in this handy little appliance?
- I pour the milk into the smaller bucket to the “max” line. Smaller amounts can be made, but I used the entire batch within a week.
- I plop the starter into the milk.
- I place the flat lid over the smaller bucket.
- I put the bucket into the main container.
- I put the domed lid on the main container.
- I plug in the yogurt maker.
- I set the timer. (This machine remembers what its last setting was, so I can skip this step.)
- I press start.
- I wait…
Once the yogurt is finished, here’s what happens:
- I unplug the unit and remove the domed lid.
- I remove the smaller bucket and the flat lid.
- I scoop about 1/2 cup of yogurt into a small container with an air-tight lid to use as future starter. I chose one in a different style and color than my other yogurt containers, so I don’t accidentally eat my starter.
- I may place some plain yogurt into smaller containers.
- I may decide to strain some or all of the yogurt.
- I may add jam to some of the yogurt.
- If I add fresh fruit, I do that just prior to eating the yogurt.
- If I decide to make several products from the yogurt, I’ll use a timer to tell me when the yogurt has reached the “Greek,” “sour cream,” and/or “cream cheese” stage. Then I can portion the result as desired.
- I pour the whey into a securely lidded container and put it into the refrigerator.
- I make bread and/or soup at least once a week, so the whey is almost always used.
- And, as a bonus, I use the same type of container for my sourdough starter that I use to store the whey and the bulk yogurt that I store after it’s been made.
Here’s a Video of Dash Yogurt Maker in Action…
Yogurt Giveaway Details!
(Giveaway has ended)
Because I love the idea of making homemade yogurt and keeping things as simple as possible I’m giving away a yogurt maker!
To enter the giveaway, just answer the following question in the Comments section of this post:
“What is your favorite way to enjoy yogurt?”
Just share your favorite way to enjoy yogurt and you’re automatically entered to win the Yogurt Maker.
THE RULES
One entry per person, please
Winners will be announced next Sunday.
Good luck!


I like my non fat Greek yogurt with fruit for breakfast.
* mix salsa with yogurt to make dressing for taco salad
* mix 1/2 Labne (strained thick yogurt) and 1/2 yogurt with garlic pounded in mortar with pestle. Add in chopped cucumbers, cooked bulgur and garbanzo beans. Add salt and mint to taste. Complete meal in a bowl.
* labne (see above) on baked potatoes with blue cheese crumbles and sliced tomatoes on the side
* mix labne with boiled eggs mashed with a fork, salt & pepper and anything else you want to add for egg salad
I love my greek yogurt with natural preserves for a delicious breakfast or snack. It gives you that something sweet yet tangy that satisfies.